Gumoil 2.0
 |
| 9x17 inches, Arches Platine, 1:3 plus 30% dist. water gum solution, ("green" curve and transparency) |
I first heard about the gumoil process in July of 2013. I was introduced to it during an advanced alternative processes workshop led by my friend and go-to mentor for all things alt pro, Christopher James. Christopher asked Cotton Miller, his assistant for the workshop, to do a quick gumoil demonstration because he had become quite familiar with this elusive process while using it for some of his MFA work, creating a series of beautiful and haunting portraits of Boston subway commuters. At the time, I had no idea just how frustrating gumoil could be, but after a few years of trial and error, I have found ways of reining it in. My work was included in The Book of Alternative Photographic Processes, Third Edition, by Christopher James. You can buy it here at Amazon.
The process was developed in 1990 by painter, printmaker and photographer, Karl Koenig, who lived and worked in New Mexico. Unfortunately, Mr Koenig passed away in 2012, but he left behind a legacy of beautiful artwork, including many gumoil and photogravure prints. The Photographers' Formulary has a great bio of him that you can read here. Also, an artist statement by Mr Koenig can be found here, and his website contains many images of his gumoil and photogravure prints that can be found here.
The process, in brief
The gumoil process begins with a positive image on transparency film. This positive is placed in contact with a layer of typically uncolored gum bichromate to create a negative gum bichromate print. This gum layer acts as a resist to oil paint that is applied after the gum layer has dried and fully hardened. Excess paint is removed after being allowed to sit on the paper for a few to several minutes. This leaves the hardened gum areas lighter than the areas where there was little to no gum and where the paint has been able to get into the paper. The print is soaked in water then either wiped clean and left as is or "etched" with bleach to clear away some of the gum, exposing the paper underneath making another pass of paint possible. Each step of the process is always finished with a cool water running water rinse to remove excess chemicals and to clear away unwanted gum or paint film.
The positive transparency
The gumoil process uses a positive transparency for the gum layer rather than a negative, so that what we end up with is a gum bichromate print in negative form. The areas containing hardened gum bichromate will resist paint, allowing the highlights and even some middle tones to be wiped clear of paint. The white (or whatever color paper you are using) areas in the gum bichromate layer will be the shadow areas in the final gumoil print, and they need to be free of any gum resist so that the paint can get onto the paper.
Because gum bichromate tends to have a very limited tonal range (around 6 stops), you need to compress your highlights and shadows into a small space by lowering the contrast of the image. In other words, if you used a normal positive image for your transparency, with a normal tonal range from deepest black to whitest white, including subtle tones in those areas and in between, you would lose detail at one end or the other during exposure. If you exposed your gum print for enough time to get what will be the darkest visible details in your shadow areas to print, your highlight details will be overexposed, becoming washed out and showing no detail in the final print. The opposite is true if you expose for your highlights, so you need to find a good middle ground. And, because a gumoil print will be getting wiped or bleach etched for clearing, it is very lossy in terms of detail. You need to focus on maintaining (exaggerating, really) your finer details while making your positive transparency if those details are important to you.
The following is an outline of three different methods I use to create positive transparencies for my gumoil prints. All of my editing work is done in Photoshop CC, and I print my positive transparencies on Pictorico Ultra Premium OHP Transparency Film.
1. The most serendipitous route:
I use a curve that I’ve been using for my gum bichromate prints to lower the contrast (compress the tonal range). This method is the quickest but also the most prone to faults. It tends to allow the loss of the fine details in an image because testing and care aren’t taken to ensure those details make it to the final print with proper test printing and a curve that has been properly tailored to fit the various elements in the process. It does, however, usually give me half decent print, or at the very least, something to play with.
First, I usually use the Shadows/Highlights feature in Image-Adjustments to make the details in my image pop a little, simply because I know that they will tend to get lost with this process. After I have gotten my image to where I like the look of it, and working in grayscale, I apply my simple gum curve (see “Simple Gum Curve image) that lowers the contrast, convert to RGB, then print my positive transparency. I adjust my exposure time as needed for different papers and gum solutions. I can use this for gumoils that I will either be printing in multiple passes of paint and etching with bleach or if I’m just looking to do a single pass of paint.
 |
| Simple Gum Curve |
2. A method with a somewhat more predictable outcome, though a little fussy:
Using an image I am happy with and while working in greyscale mode, I add a little of the Shadows/Highlights feature—3-5% for the shadows, and the same for highlights—to define my details. I look at the tonal range in my image using the Eyedropper tool and roughly locate some 5-10%, 50%, 90-95%, and 100% black areas by hovering my Eyedropper over my image and watching the percentages in the “Info” tab in my workspace. I make note of where these percentages are located within the image. I frequently lighten the 100% black using either the Output slider in Levels or in the curve itself. In the curve, this the end point that is “0”—here the black is 0 and white is 255, this is different from the percentages you see with the Eyedropper tool. How much I lighten this varies, but I only make small adjustments to the black because I want a deep black in my final print. I go back to my image with my Eyedropper tool to check on the black percentages (now we are back to percentages) again. I want my 0% black (white, obviously) to remain the same. I want my lightest distinguishable highlight detail, which is usually around 5% before adjusting, to now be around 20%. I want my 50% to be either the same, or a little bit darker than it was before adjustments. 60% is fine. I want my darkest distinguishable shadow detail, which usually starts at 90-95%, to be around 85%, and I want my 100% black to either remain the same, or be somewhere around 90-95% black. I go back to Shadows/Highlights and make more small adjustments to the image, typically starting at 3-5% for the shadows and 2-5% for the highlights. Doing this will add more contrast back into the whole image, so I often have to lower the image contrast again using a curve that is less pronounced than the first. Sometimes I have to go back and forth like this a few times to get a good combination of image detail and overall low contrast.
This works for both multiple pass and single pass prints, though I usually don’t lower the overall image contrast as much with a multiple pass print as I do a single pass print. An image that hasn’t had the contrast lowered as much as a single pass print can handle a slightly longer exposure, which I will want to do if the print is going to be etched and have more paint applied.
3. The most reliable method for making a gumoil transparency; time consuming in the short term, but a great help in the long term:
This method involves making a curve that is customized to fit my paper, transparency type, gum solution, and my exposure unit, giving me a good tonal range with a particular combination of elements in mind. It is the method I use most frequently now because I can just plug in my curve and proceed, usually with only minor adjustments after a test print.
In Photoshop, I grab an image of my 21 step grayscale wedge, add my simple gum curve to it while in greyscale mode, then convert my image to RGB and print my positive. There are numerous instructions online for making a grayscale step wedge (also called step tablets), and they are quite easy to make. You can also find some with 11 steps, but I prefer 21 because it represents greater detail. After printing my step wedge positive, I make a series of test gum bichromate prints with it (more on making the gum layer later), giving each a different exposure time. After applying paint and processing the prints, I look at my shadow areas.
 |
| 21 Step Wedge |
The details in the darker end of the tonal range in gumoil tend to get very blocked up and muddy, so finding an exposure time that works best for this part of the step wedge then adjusting the curve to get the lighter end looking right is what works best for me. I do this whenever testing different gum bichromate solutions or when I add a color layer to my positive for density. Exposure times among gumoil printers can vary pretty widely, with some people exposing for as little as 2 or 3 minutes and others for more than 20 minutes. Finding an exposure time that works well for you and your situation will take a little trial and error before you nail it down.
The first thing I look for is a rich 100% black with at least a few other steps in the wedge printing some tone. If I am only getting some grayish tones in the darker end and nothing but a little bit of grain in the lighter end, I shorten my exposure time. Once I have that 100% dark black and a few (hopefully several) other darker steps printing a deep tone, I keep this as my exposure time. Then, using Curves in Photoshop, I start pulling down my mid tones and highlights until I get a good range in my step wedge prints. I raise my darker tones by very small increments to open them up as necessary.
Though this process can take some time and effort, once you have created a good custom curve for your own situation, it will continue to work well for you. Of course, there are always things that happen that can have an impact on your printing, like humidity, paper changes, paint changes, inconsistencies in gum arabic, etc, but having your custom curve gives you a good starting point to make any adjustments needed.
Here is a custom curve I made for myself. It is exclusively for use with a monochromatic (grey) transparency, a 1:2.5 gum solution on Arches Platine exposed for about 6 minutes in my exposure unit, allowed to dry, then coated with a favorite paint mixture of mine using 2 different paints and cleared at the sink using hot water and sodium metabisulfite.
 |
| Curve for grey transparency |
This is the resulting printed step wedge. Though there is still a little muddiness in the 90% and 95% steps in this little print, it is close enough that a slightly shorter exposure time fixed the problem in subsequent prints.
 |
| Step wedge print for grey transparency and curve |
 |
| Original image |
 |
| After curve |
 |
| Dried gum layer |
 |
| Finished print, Arches Platine, 7.5x7.5 inches |
Adding a color layer to a transparency
Recently, another gumoil printer, Jake Groenhof, shared some of his gumoil prints online. They were very crisp and clean, and his step wedge showed a great tonal range. He told me what he was doing to achieve these results, and I started some new testing using parts of what he was using in his process, notably, adding color to my transparency for density, and using a thinner gum bichromate solution that has a slightly higher contrast than the one I use. The added density allows me to keep my curve in the middle area of the curve grid with an exposure around 8 minutes. This is great because it leaves me room for adjusting the curve for any changes I want to make in paper, paint, exposure time, etc.
Although I’ve gone a different route than Jake for the color, I find it works very well for me in my working situation using Arches Platine and his gum bichromate solution. For reference, his solution is 1:3 (dichromate:gum arabic), with the addition of 30% (of combined dichromate and gum solution) distilled water.
I open an image file in Photoshop. Working in greyscale, I add a little Shadows/Highlights editing to the image—3-5% for both shadows and highlights, then apply a curve that I have customized specifically for this type of transparency combined with Jake’s solution and Arches Platine (see above for information on creating a curve). I convert the mode to RGB and add a new layer in the layers palette with the mode being color. When the color picker comes up, I put in these numbers: 90=H, 100=S, 55=B and click okay. I got this color information from alternativephotography.com (credit: Clay Harmon) some time ago, and it might have been designed for platinum printing, but it works very well for me here. I flatten the image, save and print.
 |
| Curve for green transparency |
 |
| Step wedge print for green transparency and curve |
 |
| Original image |
 |
| After curve and green color layer |
 |
| Would We Be Missed, 2 Final print, Arches Platine, 12x17.5 inches |
The sensitized emulsion (sensitizer)
Potassium dichromate solution
The sensitizer used for the gum bichromate (also called dichromate) layer is a mixture of saturated potassium dichromate solution and gum arabic. This is also what one uses when making a gum bichromate print, but the ratio of dichromate to gum is different, and there is typically no pigment added for gumoil. Many gum bichromate printers consider a 13% solution of potassium dichromate to be saturated, but I use a pre-mixed solution from Bostick and Sullivan that is a 10% mixture. It's what they sell specifically for gum printing and works quite well for me.
Potassium dichromate is nasty stuff. It is considered carcinogenic and mutagenic, among other things. Use caution with this chemical. Keep it off your skin, out of your eyes and mouth, and do not breath it in either in powder form or in mist form if you are spritzing your prints to clear excess hardened gum.
If you are mixing the dichromate yourself from a powder, to make a 13% solution, add 13 grams of potassium dichromate powder to every 100ml distilled water. A 10% solution would be 10g in 100ml distilled water, and so on.
Ratio makes a difference in the sensitizer
The ratio of dichromate to gum that I was taught to use is what Koenig used--1 part potassium dichromate to 3 parts gum arabic. This is what I used for the first several months that I worked with the process. I had mixed results that were far from predictable, but a lot of that unpredictability might have come from my own inconsistencies with all of the variables that exist in this process. I walked away from gumoil for several months, but when I came back to it, I accidentally started using a mixture of 1:2. Right from the start, things just fell into place. There was consistency, predictability, and I was happy. I now typically use a 1:2.5 solution, but the 1:2 is still a nice option. Both of these and the 1:3 plus 30% distilled water are what work best for me with the Arches Platine, and they are what I use most often, but I've found that thicker, more velvety papers yield better prints with the traditional 1:3 solution. The 1:3 solution tends to flake off in larger bits when I use it on Arches Platine, but the velvety papers hold onto it better. I have not tried the 1:3 plus 30% distilled water on any of the velvety or textured papers yet and don’t know how well they would work together.
Contrast in gum solutions
You can adjust the contrast of your gum solution a bit by adjusting the ratio. 1:2 is the lowest in contrast that I use, and 1:3 is the highest. Less dichromate equals more contrast.
The gum layer
The first layer of the gumoil process is made using one of the gum bichromate solutions described above. A positive transparency (NOT a negative) is used during exposure utilizing either sunlight or a UV exposure unit. During exposure, the gum bichromate hardens to greater and lesser degrees, depending on the density of the areas within the positive transparency. The unhardened gum is washed away in the first rinse following exposure.
When coating my paper, I want a smooth finish without any obvious brush strokes or gaps that allow plain paper to show through. The amount of thickness also needs to be uniform. If the coating is too thick, it will tend to flake off in the rinse leaving a blotchy, textural look in the final print. Applying it too thinly can result in a coating that is not uniform, leaving paper exposed where I don't want it to be. Though, if done well, a nice effect can be achieved with a creative brush application of the gum bichromate.
Brushes
I use Richeson synthetic flat wash brushes for almost all of my alternative process coating. They hold liquid nicely, clean up better than a lot of cheaper brushes, leave a fine, smooth coating, hold up well over time, and don't leave debris on my coated paper. The sponge type of brush that Koenig uses in the video that most gumoil printers have seen online can leave debris in the coating. These brushes also tend to create bubbles, especially when coating several sheets. The bubbles can then translate to dark spots in the final print. If you’re going to use this type of brush, get a good one. They are considerably less expensive than the Richeson brushes up front, but you will be throwing them out far more frequently, so they might be more expensive in the long run. I use the widest brush I can for each sheet I’m coating. For prints that are 11x17 and larger, I use a 3 inch brush. This helps keep the coating smooth and even.
Coating the paper
I mix enough solution ahead of time to cover all of my prints with a little left over. As much as I hate wasting solution, having extra is always better than trying to spread a thin layer over a sheet of paper just to find it's not enough--wasting paper is even worse. Before coating, I lay my transparency on top of my paper and make little marks in the corners that are about 3/4" larger than the actual printed area of the transparency. The reason for this large border is that the edges of the gum layer tend to develop an uneven texture from the brush. It's best to have this well outside the print area to avoid flaking off in thicker spots. To cover 3, 11"x17" print areas on Arches Platine (not the paper size, but the size of my transparency plus a little extra border), I mix 10ml potassium dichromate to 25ml gum arabic (1:2.5) making 35ml of solution. Using my watercolor brush, I get full coverage for those three sheets with just a little left over. If you're using a foam brush, you will have to mix more because the brush soaks up a lot of the solution. Some papers that have a little more surface texture, like the Rives BFK that I also frequently use, also need more sensitizer to cover well.
Before I apply my sensitizer, I dampen my brush in distilled water then gently press out the excess with a paper towel. When loading the brush with sensitizer, I make sure it is full but not dripping when I go to the paper. I apply the sensitizer at a corner first, brushing along a border, heading toward another corner. Then another corner and border, and filling in the center as I go. This helps keep the borders neat, especially on larger prints. After I get all the solution I will need on the paper, I start to smooth it out, working quickly. I work one direction at a time: all strokes left to right, then top to bottom, then right to left, then bottom to top. Smooth, steady, even strokes. I keep going until I feel the gum starting to tug at the brush. If I go too long, the brush starts to skip across the gum, and this leaves marks in the coating that can show in the final print.
If I find little bits of pet hair, brush fibers or other debris in the solution on my paper, I remove it before the gum gets too dry and brush to smooth out any marks I’ve made. If my coating is too tacky to remove the debris, I leave it until after the coating is dry and carefully try to remove it before exposure. (wear gloves! even dry, this stuff still has active dichromate in it!!) If I can't get it out, then I go ahead and expose anyway, but I know that it might leave an open area in the paper and that area will take paint. I try to put these little bits of debris into the darker areas of the print so they won't show.
The thinner solutions (1:2 to 1:3 plus 30% d. water) coat more easily and evenly than the 1:3 (no additional water). In fact, the 1:3 plus 30% distilled water flows so beautifully over the Arches Platine that even in winter when the humidity in my workspace gets down to 25% and the paper is equally dry, I have no problem getting a smooth coating. The thicker solution, 1:3 and even sometimes 1:2.5, can be hard to brush on when the humidity is so low. I find myself adding more and more solution to keep it wet as I try to spread it around on the paper. The often gives me an uneven coating that is blotchy and heavily speckled from the little bubbles that formed in the thicker gum areas that wouldn’t smooth out. Adding a little water (10-15%) to my 1:2.5 solution works well in the dry season.
A word about grain
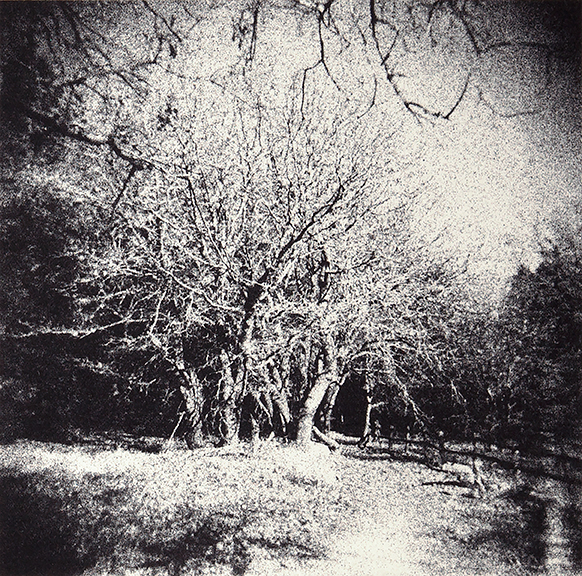
Alas, attempting to get a good digital representation of the grain in my prints has proved elusive. The digitization of the grain has made it much more pronounced, when in reality it is softer and much more refined. There simply is, however, grain in this process, and it shows much more in the larger, soft tonal transitions (see Would We Be Missed, 2 image). You will often see it in the sky in landscapes. Using images with a lot of overall crisp detail shows less grain in a gumoil print (see Tree House image). Also, printing an image with higher contrast reduces visible grain (see The Trees Have Eyes image).
Something to consider when coating your paper is how thickly you apply it. Thicker coatings can leave a little more pronounced grain, and thinner ones can leave a softer grain. Applying your coating too thinly, especially on large prints or in very dry conditions, can be difficult because your coating can start to dry too quickly, leaving brush marks. You will get a feel for what works best for you in your situation. Practice, practice, practice.
You can reduce the appearance of the grain in any print by doing a second pass of paint that is slightly lighter in tone than your first pass of paint. This requires a bleach etch though, and that can be a little tricky to get right at first. With some practice, it becomes fairly routine.
A word about grain
Alas, attempting to get a good digital representation of the grain in my prints has proved elusive. The digitization of the grain has made it much more pronounced, when in reality it is softer and much more refined. There simply is, however, grain in this process, and it shows much more in the larger, soft tonal transitions (see Would We Be Missed, 2 image). You will often see it in the sky in landscapes. Using images with a lot of overall crisp detail shows less grain in a gumoil print (see Tree House image). Also, printing an image with higher contrast reduces visible grain (see The Trees Have Eyes image).
Something to consider when coating your paper is how thickly you apply it. Thicker coatings can leave a little more pronounced grain, and thinner ones can leave a softer grain. Applying your coating too thinly, especially on large prints or in very dry conditions, can be difficult because your coating can start to dry too quickly, leaving brush marks. You will get a feel for what works best for you in your situation. Practice, practice, practice.
You can reduce the appearance of the grain in any print by doing a second pass of paint that is slightly lighter in tone than your first pass of paint. This requires a bleach etch though, and that can be a little tricky to get right at first. With some practice, it becomes fairly routine.
Let the coated paper dry completely
After the paper is coated and the surface has started to go from shiny to matte, it is hung to dry in a dark, dry space. The paper will have a crispness to it when it's dry, and it won't have cool spots on the back where the moisture is still evaporating. In my basement, it usually takes about 3 hours to dry on its own in the summer and only an hour or so in the winter. If there are any damp areas in the paper, the sensitizer won't expose evenly, so drier is better. Some folks keep their gum coated paper in a dry, dark place for a few days, but I don't like leaving mine unused for more than 10 to 12 hours at most.
Lighting in the workspace
Gum bichromate isn't highly light-sensitive until it is dry, and even then, a lot of gum printers prefer to work in subdued ambient light. I like to work with yellow lighting. I use Philips Hue lightbulbs. I can change the color and brightness of my lights using an app--very convenient! Once your exposed paper is in the water, you can turn the white lights on.
Exposing
For exposure, I use a UV unit that was designed for screen printing. It is an aluminum box with the lights below, and a sheet of glass above. The coated paper that I'm going to expose is placed face down on the glass with a negative or positive transparency in between. I use either a contact print frame or compression (sheet of plexiglass with weights on top) to keep the transparency in firm contact with the paper. The 36"x36" exposure area on this unit is great for large prints. UV units give you a boost in predictability that working with the sun does not afford, but yes, they can be expensive. There are plenty of DIY instructions online for building one, so you might want to look into making one for yourself.
Most of my prints these days are single pass prints. Meaning, they get one exposure, one coat of paint, and one pass through the clearing process, with no additional work. My exposures with a 1:2.5 solution, my type of transparency, and Arches Platine typically take around 6 minutes for a single pass print. Rives BFK off-white takes just a little more time than the Platine, and if I use a 1:3 solution, it will take a even longer. Using a 1:2.5 solution with Stonehenge Rising takes 10-15% more time than the Platine.
Unfortunately, there is no way for me to describe exactly what your gum layer should look like immediately after exposing because a very wide range of exposures will give you fully realized negative images before washing and clearing the print. What it looks like after clearing is what's most important. The areas that will be your darkest blacks should be showing cleared paper or very nearly so. You should be able to see your darkest shadow details in faint relief when looking at the paper from different angles if not straight on. You should be able to see some definition in the denser areas of the wet print as well (what will be your highlights).
Clearing the gum bichromate negative print
After exposure, the print will be a negative and will have gold to medium-dark brown areas in it. (Don't fall in love with it. It will change A LOT after rinsing.) First, it gets a soak in lukewarm water for 5 minutes. After soaking, I give it a gentle, lukewarm water rinse with my hose sprayer at my sink. The water pressure is so low that the water is just sort of falling out of the sprayer. Sometimes I even use a small plastic cup that I keep at my sink to flow water gently over the print. The idea here is to clear away unhardened gum without destroying the gum I want to keep on the paper.
Wet gum bichromate has a sort of mushy thickness to it that rinses off in tiny bits, so as you can imagine, the little details of your image can get lost in this mushiness and in the clearing stage. It also stands to reason that bigger prints yield greater detail. If detail is important to you, print as large as you can to get the greatest detail.
Koenig used a spritz bottle to get bits of gum bichromate out of those small detail areas to open up the paper and allow oil paint to get in. I've never had success with a spritz bottle because it always removed too much gum and did so unevenly. I turn the water pressure way down when using my hose end sprayer so it doesn't create a mist the way a spritz bottle does, and I'm not worried about breathing in dichromate particles. Consider your situation carefully, and act accordingly.
The print is then washed in a cool running water bath for 30 minutes, and very gently sprayed once again with lukewarm or cool water before being hung to dry until the next day. At this point, the print is but a faint version of its former self. It will be a very pale, sort of olive-gray-green color.
DO NOT LEAVE YOUR PAPER IN ANY OF THE CLEARING OR WASHING TRAYS FOR TOO LONG. You can end up losing some of your image details this way. You might still get a decent single pass print from it, but you may not get the opportunity to do any etching if too much of your gum washed away while you were clearing it with water.
Things to consider when adjusting the gum layer for a second pass (layer) of paint
The above paragraph is describing what I do for single pass prints--one layer of paint and no more. I don't typically attempt a multiple pass print until after I've gotten a good single pass print working. After I've achieved a good single pass print, I start working from it to get a multiple pass version. When making multiple pass prints, I will be etching the gum with household bleach to open up areas of paper to let in more paint. Household bleach is also different here in the States from what is sold in Europe and Australia. You will have to experiment to find what works best for you.
Often, when I’m going to do a second pass of paint, I can keep the exposure the same as it was for my single pass version before doing an etch. If I am using a colored paint, as opposed to grey or black paint, then I can expect to see more grain that comes from the contrast between the color and the black paint of my first pass. If I’m using grey or black paint, these paints help to fill in the grainy areas seen in the first pass. If I want to (try to) avoid the grain in a colored print, I can increase the contrast in my positive transparency by a small amount and boost my exposure time by 10-15% to allow for a deeper etch. The deeper etch removes some of the grain from the first pass and lets more color in with the second pass. These very colorful prints can be quite dramatic but can be very difficult to control simply because the etching is so difficult to control. For prints getting more than two additional passes of paint, I will slightly increase the contrast in my positive and add 10-25% more exposure time to allow for multiple bleach etchings.
Every time I etch, it's a bit unpredictable and becomes increasingly more so with each subsequent etch. I've rarely gotten a truly successful fourth pass of paint, and even the third passes I've done were a dicey business at best. Using a 1:3 sensitizer ratio with an even longer exposure for multiple passes creates a softer gum layer, and you might find you like it more for bleach etching and multiple passes. I find it to be more unstable and less predictable though. A change from 1:2.5 solution to a 1:3, for 2 or more passes, could easily go to 25% more exposure time, if not more.
Paint block-up with long exposures
One very strange phenomenon I came across early on was having large areas of my print "block-up" with oil paint despite the fact that I could clearly see gum in areas that weren't releasing the paint, and I knew that I had given the exposure a lot of time (8-10 minutes). The paint just wouldn't wipe off large areas where it had done so in many other prints. A longer exposure only made it worse. In an angry fit, I even let one print expose for something like 15 or 16 in an attempt to create a paint proof layer of gum, and it raged right back at me by completely blocking up with paint--not one bit of it wiped clear. I found at least one other tortured soul in an online discussion board seeking help when he or she had the same problem. I have no idea why exposing the gum for too long would cause it to stop acting as a resist to the oil paint, but it seems you can do just that if your exposures are way too long.
The paper
Arches Platine is a beautiful paper, and it's my go-to paper for many alternative processes. It has a nice, smooth surface and holds up very well in water, even after multiple passes through trays of chemicals, coats of paint and dichromate, rinsing, repeat, repeat, etc. It also tends to shrink less than most papers, making any needed registration easier. I also use Stonehenge Rising paper, but the 320gsm (120lb?) version is getting harder to come by in anything smaller than 30"x44". The Stonehenge has a harder size in it, and because of this, the gum layer needs about 10-15% more exposure time than the Platine for the same end result. Rives BFK (280gsm) is a traditional printmaking paper, and it feels similar to the Platine before wetting, but the fibers are raised considerably after wetting. After the gum layer is processed, the paper will have a little more texture to it than the Platine. This means that the paper will hold more paint though, so the blacks are richer, and colors more intense but usually at the expense of finer detail unless the time is taken to create a custom curve and workflow specific to this paper. I use the off-white, and like it a lot as an alternative to the bright white of the Platine. The buff color BFK seems like a completely different paper and didn't work well at all when I tried it. I've also used Twinrocker watercolor paper with some success. Lastly, if you use the back side of the Platine, it works a lot like the smooth side of the BFK off-white and holds onto the paint more. It does have a different texture than the front, and I waver back and forth about it.
In brief:
Favorite paper is Arches Platine. Smoother finish, finer detail, but slightly lighter black, paler colors, backside yields deeper black but has different texture and might yield less detail. Less shrinkage than with most other papers I’ve tried.
2nd favorite is Rives BFK 280gsm off-white. Deeper black, colors more intense, but small details can get lost, and paper shows more texture. Also needs slightly longer exposure.
3rd favorite is Stonehenge Rising 320gsm. Finer detail, but blacks and colors are a little lighter. Only available in very large size.
The paint (not all paints are created equal)
A good place to start with gumoil is a rich, deep, black. Lamp black fits this description better than any others that I know of. There are artist grade paints and student or economy paints. Always buy the former. Student and economy paints are cheap for good reason: they don't hold up well and colors often are not permanent. As a painter, I tend to use good quality, artist oil paints. Though I'm not really a fan of Winsor and Newton paints, I started doing gumoil with a Winsor and Newton lamp black because it was available in a large tube, and it's a carbon based black that won't fade, regardless of who makes it. Yellowing was never something I thought I would have to consider with a black, or even most colored, paints. Eventually, I moved on to a lamp black by Williamsburg which is a better quality. I was also using my favorite Gamblin paints for the colors and loved them a lot.
Then, this happened…
I was showing some of my gumoil prints to a family member, and when I pulled out some of my older prints I saw that many were yellowing badly wherever the paint was in contact with the paper. Even the ones I had just made with my good, artist quality paints were starting to show some very pale yellowing. I had never noticed it. The older the print, the uglier the yellowing. It was bleeding through the backs of some of the prints in the shapes of the images on the front, and the yellowing was also bleeding out from the paint areas into the front of the paper. This was true of the prints made with the Winsor and Newton artist paints and both the Williamsburg and Gamblin artist paints. I was gutted.
 |
| Back of print made with linseed oil paint |
The good news
After some research and some paint testing, I am convinced it was the linseed oil in the paints I was using. All linseed oil paints will yellow to some degree. This doesn’t mean they are bad paints, it just means they aren’t great for gumoil because wherever they get into the paper, they turn the paper yellow. There are paints made with linseed oil alternatives though.
M. Graham uses walnut oil. Although some of my older prints made with this paint show yellow through the back of the paper, it isn’t nearly as bad as the linseed oil paints that I was initially using. Sennelier Extra-Fine Artist Oil Paints are made with safflower oil, but I haven’t been able to find a lamp black (deepest black) in their line. Maimeri’s Puro line of paints are expensive, but they are very good paints made with safflower and poppy seed oils. But, they also don’t have a lamp black. The Sennelier and Maimeri are also a bit harder to work with. They tend to get stiff on the paper’s surface and can be hard to wipe off. I work with different mixtures to get a combination that works well with my paper. The combination I like best at the moment is 1 part Maimeri Puro ivory black to 3 parts M. Graham lamp black.
Colors
Lamp black is a great black, but not all paint makers sell it. Ivory, carbon, and mars blacks are also nice blacks, a little lighter in tonality, perhaps, but good. As far as colors are concerned, check manufacturers' websites for the lightfastness of each color; it can vary considerably with less stable pigments. Reds can be tough in terms of stability. Stay away from alizarin crimson altogether. It just doesn't have a great lightfastness coming from any brand. There are also differences in the transparency of paints. Opaques tend to have less oil (lean paints) and transparents tend to have more oil (fat paints). Transparent paints are frequently very high chroma (intense color), and the combination of a lot of oil and a lot of color can mean staining, even in areas where you don't want it to. Manufacturers usually state on their websites whether their individual colors are opaque, transparent, or somewhere in between.
Oil-based etching inks and water mixable-oil etching inks and paints
The oil-based etching inks that I tried were too hard to rub on and impossible to wipe off. After that experience, I didn't even try the water-mixable etching inks I have, but I did try a water-mixable oil paint. It was interesting and might be worth looking into further at some point. Initially, the dry print wiped cleaner than the ones made with oil-based paints tend to, but as expected, the paint started to wash away once the print was put into a tray of water, and further attempts at wiping highlight areas after the paint and paper were wet just made them muddy and messy. These water mixable paints and etching inks are also made with linseed oil that has been altered to make them mixable and washable with water. So, we’re back to linseed oil with these anyway.
Paint application
Prepping your paint
After the gum bichromate negative print has dried completely, and preferably overnight, it's time to apply the paint. If I’m starting with a mixed color, I make sure I have mixed enough ahead of time to cover the entire area I intend to use it in. I might not be able to mix the exact color halfway through the application, leaving me with an uneven color application. If I’m using an unmixed black (or other paint that doesn't need mixing), I squeeze out as much as I think I’ll need, and if any excess oil comes out of the tube along with the pigment, I soak it up with a paper towel and am careful not to mix it in. I want as little oil on the paper as possible. If there is still some oil around the paint that I can't soak up, I don't worry about it but I do mix it in before I start applying it to my paper.
Good paint is expensive. I scoop up any excess and store it in an airtight container for later use.
Tape down the gum print
I like to tape off the edges of my print before adding paint to keep it neat and clean. I use a very low tack tape that I get through Amazon that is made by Protapes or Pro Scenic: Pro Scenic Tape. It is sold as a painter's tape and has gotten mixed reviews for use in that way because it doesn't stick as well as some DIYers would like, but it's perfect for this purpose. It is far less likely to damage my paper than any other tape I've tried, and I feel it would make a great all around artist's masking tape, if not for the color. 3M also makes a white low tack paper "labeling" tape that I believe uses the same type of adhesive as their Post-it notes pads, but it’s more expensive than the purple tape I use. I tape right up to the edges of my image border and right out onto my table. This also keeps the paper steady for me as I wipe paint on and off of my print.
Brush, or cloth?
I started out using stippling or stencil brushes for paint application. It's a good way to get a lot of paint onto the paper rather quickly. One technique is to sort of stab at the paper with the loaded brush to get the paint into the paper fibers. I've found that with a good gum layer, I don't need to do this. Now, I typically just use a very soft cloth, like an old t-shirt without printing on it, that I cut into small pieces. I don't have to worry about cleaning brushes with solvents, which is messy and tends to waste a lot of rags and/or paper towels. I make a little ball out of the t-shirt scrap, dip it into my paint, and gently rub it onto the surface of the paper, using very little pressure. I don’t want to mar the surface in any way because this can show in the final print.
Wiping paint off again
I leave the paint on the paper for about 5 (more or less) minutes before wiping it off with Viva paper towels. They are old school paper towels that resemble workshop towels. They are more felt-like and don’t have any “quilting”, texturing, or printing on them that might somehow leave traces of themselves on the surface of my print. I wipe until I can clearly see the details in my image (it will be a positive at this point) and there is just a hint of paint still showing up on my paper towel after wiping. There will be a grey (or whatever color I choose to start with) haze over everything. I try not to over wipe the paint because this can pull out too much of the deep black from the shadows. If I find that my shadow areas are getting too light, then I am either wiping too aggressively, or I need to rework my positive or shorten my gum exposure time.
 |
| Print framed with low tack tape and wiped clean |
Processing the print after applying paint
Start with a brief soak
After wiping my print at my work table, I put it into a tray of very warm to hot tap water to soak for 5 minutes. I wet the surface first, then flip it over, making sure there are no bubbles trapped underneath the paper. These bubbles will make certain areas harder to clear because the water hasn’t gotten past them and to the paper. After soaking, I lay my print face up in my sink and spray it with very warm to hot tap water with the pressure coming out of the sprayer being fairly high to really loosen the paint on the surface of the gum.
What happens next, depends on whether I feel the print will be finished with just one pass of paint or if I feel I want to etch it and try more passes of paint.
Single pass print
After soaking and spraying my print, I decide if I want to wipe it before I put it into a sodium metabisulfite bath. It really depends on whether or not the print looks like it needs it. Sometimes I don’t have to wipe my prints again after I have wiped them at my work table. If my curve has worked properly with my gum solution, paper, etc, then all I have to do after soaking and spraying is leave the print in a bath of .75% sodium metabisulfite (7.5 grams/liter of water) for 4 or 5 minutes. Sodium (and potassium) metabisulfite removes a lot of the dichromate “stain” in the highlights, making them clearer and brighter. It also eats away at the gum, freeing some of the paint haze and residue. When I remove the print from the sodium metabisulfite bath, I give it another spray (not as much pressure coming out of the sprayer this time) with very warm to hot water. This removes unwanted paint haze from the print. Next, I either put it back into the sodium metabisulfite for another minute for further clearing, or simply put it into a rinse tray with cool, running water for 45 minutes. While it is in the final rinse tray, I take a cotton ball that I have pulled apart a bit to loosen it out of its ball shape, and with the print submerged in the water, I gently drag the wet cotton ball “entrails” across areas of the print that aren’t as clear as I might like.
If the print looks a little too dark in the shadow areas after the first hot water soak, I will give it a very gentle wipe with a soft sponge while it is sitting face up in my sink. I let hot water flow over the print as I wipe it. Then it goes into the .75% sodium metabisulfite bath for clearing for 4 minutes. After my print is finished clearing in the sodium metabisulfite, I remove it, place it face up on the surface of my sink, and spray it with very warm to hot water to clear away paint haze. Then it goes into a cool running water rinse for 45 minutes and is gently wiped with a wet cotton ball in any areas that might need to have some haze removed.
If I am losing too much of my image after wiping, then I try a shorter exposure time. If this yields shadows that are blocked up and lacking detail, then I know I have to rework my positive.
Here are some examples of single pass prints, all on Arches Platine, some using a 1:2.5 gum solution and some using a 1:3 plus 30% water gum solution, wiped clean at the sink, and cleared in sodium metabisulfite.
 |
| Tree House 12x12 inches, Arches Platine, 1:2.5 gum solution ("grey" curve and transparency) |
 |
| Bellevue Garden Steps 12x12 inches, Arches Platine, 1:3 plus 30% dist. water gum solution ("green" curve and transparency) |
 |
| Heaps Peak Trees 7.5x7.5 inches, Arches Platine, 1:2.5 gum solution ("grey" curve and transparency) |
 |
| The Trees Have Eyes 12x12 inches, Arches Platine, 1:2.5 gum solution (second, "fussy" method, grey transparency) |
 |
| Heaps Peak Burned Trees 9x9 inches, Arches Platine, 1:2.5 gum solution (second "fussy" method, grey transparency) |
 |
| Garden Urn 7.5x7.5 inches, Arches Platine, 1:2.5 gum solution ("grey" curve and transparency) |
 |
| For Sale, Shelburne Falls, MA 11.5x17 inches, Arches Platine, 1:2.5 gum solution (second "fussy" method, grey transparency) |
 |
| Falling Ice, Peterborough, NH 11.5x17.5 inches, Arches Platine, 1:2.5 gum solution (second "fussy" method, grey transparency) |
 |
| Smokes, Beer, Dinner, Lambertville, NJ 11.5x17.5 inches, Arches Platine, 1:2.5 gum solution (second "fussy" method, grey transparency) |
 |
| Would We Be Missed, 1 12x16 inches, Arches Platine, 1:2.5 gum solution (second fussy method,grey transparency) |
Adding color to a single pass print
After the print has dried, if I like, I can wipe on a thin layer or oil paint, but remove it quickly. After disturbing the gum layer by processing it with sodium metabisulfite and wiping it while it’s wet, it has gained some texture and lost a lot of the gum resist and no longer works the way it would if I were treating it like a multiple pass print. The paint wants to stick even where gum is still present, so I tend to wipe it off as I'm wiping it on. I don't put the print back into water again because too much of the paint comes off in some areas while sticking badly to others, creating an unattractive texture. Instead, to clear some highlight areas, I use a soft cloth and sort of buff it away.
I also like to add color with oil-based color pencils. No special techniques here, I just add color like a kid with crayons and a coloring book. I haven't tried watercolor with a single pass print yet but have used them effectively after the etching process. Oil pastels also work well but can be tricky because they are basically just very thick oil paints.
 |
| Would We Be Missed, 1 Hand colored with pencils, 12x16 inches, Arches Platine |
Multiple pass print using a bleach etch
IMPORTANT NOTE: I do not wipe my print after soaking as I would for a single pass print. I feel it removes too much of the gum and paint before putting it into the etching bath. The etching process can either add or remove details. Sometimes it does both. It is a very fickle and unpredictable way of working.
After wiping the excess paint off the dry print at my work table, I remove my tape and place the print into a tray of warm water to soak for 3-5 minutes making sure there are no bubbles trapped underneath, then give it a gentle spray with my hose sprayer. After the soak in warm water, I place the print into an etching bath that is a 1:8 solution of household bleach and tap water--1 part bleach to 8 parts water. In a 16x20 inch tray, I usually use 500ml of bleach and 4 liters of water. The bleach acts very quickly, and I count seconds in my head the absolutely nontechnical way (a metronome would be better): one-mississippi, two-mississippi, etc, for 12 to 16 seconds, then put it into fresh, cool water.
I take my print out of the bleach before I'm finished counting to let it drain off a bit then try to get it into the fresh water as I'm counting that last second. When dealing with such short amounts of time, every second counts, so don't hold your print over the bleach tray after you have finished counting just to let it drain off. The bleach is still eating away at your gum layer while you're doing this. You also don't want to carry a lot of the bleach with your print into your tray of fresh water. If you have room for a second tray of fresh water, move your print from the first tray of fresh water and into the second after several seconds to further dilute any residual bleach.
Etching time is crucial but difficult to get right
Although the standard time for the first etch is 12-16 seconds, the time you need really depends on everything you have done to this point--the tonal range of your positive, the sensitizer ratio, how thickly (or thinly) you've applied the sensitizer, your exposure time, how long you left your gum layer in the rinse, etc, etc, etc. If you etch for too long, a lot of your detail washes away. While it is normal for some of the paint to wash away after an etch because it is getting carried off with the loosened gum, if you etch the gum for too long, you won’t be able to get those details back. They will simply print as solid areas of paint.
You can also use the etching process to purposely remove detail, creating a stark and contrasty image. Creative brushing in this case can also add to the final print.
Clear and hang to dry
A minute or so after placing my print in fresh water, I move it to a cool, running water wash for 30 minutes to clear the bleach from the print. When it's time to remove it, the gum is very fragile, so I don't disturb it with a spray from my hose sprayer, and I don't brush or touch it in any way. I will, however, let the cool water from an open hose at my sink run very gently and smoothly across the surface of the print while it's still in the tray, then hang it to dry. Using a cup or small pitcher to gently pour water over the surface works just as well.
Another trick for gently clearing away some stubborn bits after I have etched my print and it has come out of the final rinse is to hang it by a corner for a couple of minutes, rotating it once to keep the surface evenly wet, then place it back into the water. For some reason, letting air get to the surface tends to open it up, and more of the gum and paint film washes away after it is placed back into the water. If I overdo it, I can lose too much gum, and subsequently, more detail.
I hang the print to dry and look carefully at what is going on at this point. There is always a thin film or haze of paint left in my highlights while some of the darker mid tone areas have gotten lighter and grainier. These darker mid tones were the thinnest areas in the gum, and they have been etched to where the paper is now clear enough of the gum resist to allow paint to get into it for the next pass. I don't try to clear the highlights of the hazy paint film yet because it is only temporary, and the gum is too fragile anyway. Disturbing it too much at this point usually spells disaster for me. Those hazy, lighter areas are where I want some resist left on the paper. Leaving that haze on the print for too long, however, allows it to dry completely and getting it to come off later can be problematic. I don’t let a print in this state sit for more than a day or two.
Applying a second pass of paint
After the first etch has opened up the darker end of the mid tone areas in the paper and the print has dried, it is ready for the second pass of paint. If I'm creating a black and white print, I'll simply mix a little titanium white (less chalky and slower drying than zinc) into the same black paint I used for my first pass to make a very dark grey. Using an ivory black, which is a soft black, after a darker lamp black also works well. I’ve never liked the look of an actual middle grey at this point. It appears muddy to me. This second pass of dark grey can also tone down the grainy look that is so prominent in gumoil prints. It fills in some of the gaps, creating a slightly smoother look. It can be applied to isolated areas or over the entire print. If my print is already looking fairly finished but I want a color for atmosphere, I will apply it to either the whole print or just isolated areas. Creating a print with a range of colors can be done at this point as well, but things can get smeary and muddy very quickly if care isn't taken to keep colors separated, especially when wiping the excess paint off. It takes practice. I use blending stumps, Q-tips, and bits of cloth to apply paint if I'm coloring finer detail.
After applying the second pass of paint, I usually leave it on the paper for 5 minutes (less for really intense colors), then wipe off the excess. If I've applied more than one color, I'm careful not to smear them into areas where I don't want them. I work quickly to avoid color staining, but neatly as well.
I place the print into a tray of warm water to soak for 3-5 minutes, face down, again, making sure that no bubbles are trapped underneath the paper. After soaking, I remove the print and give it a gentle spray with warm water. At this point I already know if I’m going to attempt any further etching and paint application.
If the print isn’t getting any more paint, I place it into a tray of .75% sodium metabisulfite for 2 to 4 minutes for clearing. After it is finished soaking in this clearing bath, I place it face up in my sink and spray it gently with warm water to test how well the paint is adhering. I either wipe it gently with a soft sponge or simply spray it with my sink sprayer then do any needed touch-up wiping with a wet cotton ball while the print is in a cool running water rinse. I leave it in the rinse for 45 minutes.
If I think I can get away with a third pass of paint and processing, I will only gently spray the print with warm water after taking it out of the first soaking bath. I then follow the same steps I would if I were doing a second pass of paint: bleach etch—running water rinse—hang to dry—apply paint—leave it on for 5 minutes—wipe paint off—soak in warm water—spray—then either clear in sodium metabisulfite and place it in a running water rinse for 45 minutes, or start the etching process again.
 |
| Juniper Branch 1:2.5 gum solution, bleach etched, second pass prussian blue, 12x12 inches |
 |
| Daydreamer's Ladder 1:2.5 gum solution, bleach etched, oil paints in second pass applied selectively, 12x12 inches |
 |
| Hot Summer Night 1:3 gum solution, bleach etched, then oil paint applied to entire surface, 7.5x11.5 inches, Arches Platine |
 |
| A Foreboding 1:3 gum solution, bleach etched, then oil paint applied to entire surface, 8.5x11 inches, Arches Platine |
Getting a starker look
This approach is the most painterly one and shows the artist's hand more than the others. You are only limited (well, mostly) by your imagination here. You can gently brush your print after the first etch if you want to get rid of detail. The tools you use are also up to you--stiff, soft, textured, smooth, etc. The etching time depends on the look you want, but starting at less than the standard 12-16 seconds is best. You can always pop your print back into the bleach for a second or two if you're not seeing enough paint come off with brushing. Clearing in cool running water afterward for 30 minutes is the same as the other methods.
You can either leave the print as it is after gently brushing, clearing, and allowing it to dry, or add more paint. If there is no gum resist left on the paper (this can be difficult, even impossible to see), you can add some back in with another application of gum bichromate followed by UV exposure. Sometimes you can get away with a light scrubbing to clear away areas after paint has been applied, but this really depends on how tough your paper is and whether or not there is still a hint of gum left on it. Stonehenge Rising seems to hold up better than the Arches Platine to this scrubbing, but the Arches does fairly well too. If you still aren't getting the stark look you want, consider making a positive transparency with more contrast or using a 1:3 sensitizer ratio with a slightly longer exposure time. A 1:3 gum bichromate layer tends to be the softest of the solutions I’ve tried and is easier to remove than the others. Bleach can also be selectively brush onto a print to remove paint and details and to brighten a particular area.
 |
| Room With A View 1:3 gum solution, bleach etched, then paint scrubbed selectively, Stonehenge Rising, 16x20 inches |
And, gumoil over cyanotype is pretty great too.
 |
| Fat Chance Antiques, Winchester, NH 1:2.5 gum solution, no bleach etch, treated like a single pass print, Arches Platine, 9x9 inches |
 |
| Twilight Trees 1:2.5 gum solution, no bleach etch, treated like a single pass print, Arches Platine, 12x16 inches |
Notable artists
Lastly, here is a short list of artists working in gumoil for reference and inspiration: Cotton Miller and Michele Rogers Pritzl here in the US. Anna Ostanina in Russia. Karena Goldfinch in Australia.

Comments
Some people prefer to remove most, if not all, of the paint (also applied to dry paper) at the sink after the paper has been wetted down. It works both ways.
however calculating the volume of emulsion you use I found your coating is very thick.
From:
Karl K. 0,046 ml/sq inch
Jake G 0,035 ml/sq inch
You mention 35ml for 3 x 11x18 inch which means 35/3x11x18 = 0,06 ml/sq inch.
Even as you have a remainder, as you mention, of lets say 5 ml this would mean 0,053 ml/sq inch which looks very thick. Even more as we have been talking that more gum/emulsion means more graininess. See Cr Anderson gum bible, page ? have to look it up. It says thicker layer = more grain.
Is this correct?
Unfortunately, the grain is very difficult to capture properly in any digital manner because the digitization makes the grain look more pronounced than it is in real life, so it is much finer in person than it appears here. That considered, there is grain in the process, no matter how hard you try to avoid it. I do believe that the thinner the coat, the softer the grain, but attempting to give people a proper per inch coating amount won't work, in my thinking, because this is something that will change with things like paper choice and humidity levels.
But, you do make a good point, and this should be mentioned in the tutorial. So I will add that in!
Thanks for the reminder!
If you coat with a solution that is too watered down and too thin, you get an ugly, hazy look where the paint gets into the gum in your highlights. For instance, when I (very thoroughly) tested a gum mixture of 1:1.5 (high water content and thin), I consistently got that ugly haze. Although it is the thinnest mixture I've worked with (and coated very thinly), it also showed a lot of grain in the large grey areas. Applying a thicker coat of this mixture actually helped.
So, there is a point where both your gum mixture and your gum layer can be too thin, whether it's because it is too liquid (ugly haze/still shows grain) or too thinly spread onto the paper (uneven brush marks).
I have been out of town dealing with an important family situation and haven't been checking private messages and comments here for a few weeks, and I'm sorry I didn't get to your question right away.
Private and semi-private tutorials might be out of the question right now because I don't have a "sharable" space of my own at the moment, but workshops are something that I am looking at doing. The only sticking point with this is finding a photography facility that is willing to accommodate the use of a lot of oil paint. It does scare some folks. The process has grown in popularity enough, though, that perhaps that won't be a problem now. I'll be making some calls and seeing what I can get going this summer. I will post any news regarding workshops on this blog.
Thanks for asking!
Thank youy for the article. I have one question.
I understand the "to make a 13% solution, add 13 grams of potassium dichromate powder to every 100ml distilled water. A 10% solution would be 10g in 100ml distilled water, and so on. ". it is something I was looking for but I don't understand the "I now typically use a 1:2.5 solution, but the 1:2 is still a nice option. Both of these and the 1:3 plus 30% distilled water" Does it mean that you add 30% of 100ml ?
Thank you for your answer.
I'm constantly tweaking the process, and these things are always in a state of flux for me, so my suggestion is to just get in there, try a few things, find what is working for you, and keep refining until you have what you like.
Excellent article. I’ve just started gumoil printing, it’s tricky but so far i’ve managed to get a few prints. I have a question about clearing the green colour of the potassium dichromate (after washing). I used 7.5g of sodium metabisulphite to 1 litre of water. After about 4 minutes the green colour hadn’t gone but large chunks of oil paint lifted off the print. Could i ask if i used the right dilution? I went from the washing the oil paint off straight to the sodium metabisulphite.
That is the proper concentration of sodium metabisulfite (or metabisulphite...tomayto tomahto...?) for clearing. I also take my prints straight from the first water bath and cleaning with a spray rinse or wiping into the clearing bath. You probably won't be able to completely clear the pale color left by the dichromate in your print highlights (which are also the darkest areas of the gum print resist/matrix), but clearing should lighten it and even change the color a little bit. You could try leaving the print in the clearing bath longer, but this will also cause more of the paint to loosen. An exposure that is too long will make those highlights especially dense. These things need to be taken into consideration when creating a good curve for yourself and figuring out your best exposure time. You will go through a bit of trial and error getting it all to fall into place. Try adjusting one of these latter two things first--either shorten your exposure time so that the paint is getting to the paper instead of resting precariously on top of the gum layer, OR flatten your image more with your curve. Once you get a decent baseline on one of those two things, you can start adjusting the other until you get what you want out of the process. This process is affected by everything from humidity to water temperature and the thickness of your initial gum bichromate coating. And possibly wind speed of your darkroom fan....just kidding, but really, with this one, I might not rule that out. ;)
Very fickle process!